`
ydbc
  • 浏览: 715763 次
  • 性别: Icon_minigender_1
  • 来自: 大连
文章分类
社区版块
存档分类
最新评论

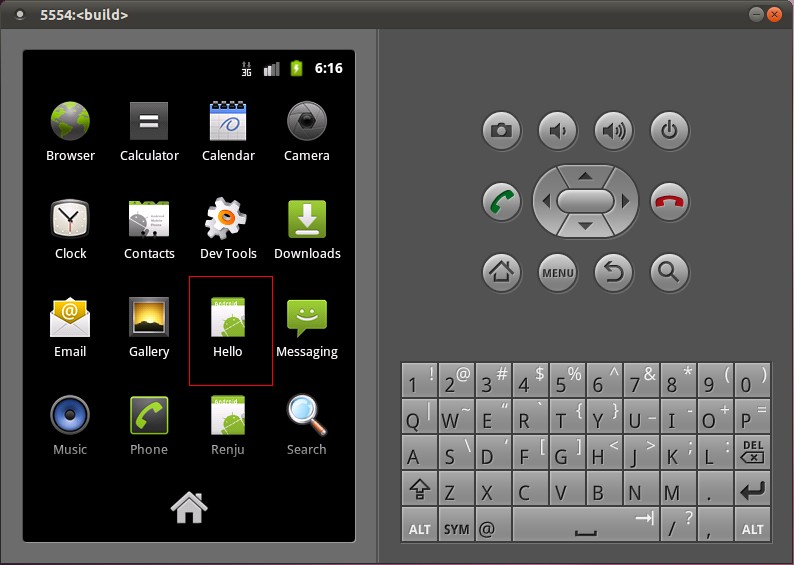
在Ubuntu上为Android系统内置Java应用程序测试Application Frameworks层的硬件服务

 
阅读更多

我们在Android系统增加硬件服务的目的是为了让应用层的APP能够通过Java接口来访问硬件服务。那么, APP如何通过Java接口来访问Application Frameworks层提供的硬件服务呢?在这一篇文章中,我们将在Android系统的应用层增加一个内置的应用程序,这个内置的应用程序通过ServiceManager接口获取指定的服务,然后通过这个服务来获得硬件服务。

一. 参照在Ubuntu上为Android系统的Application Frameworks层增加硬件访问服务一文,在Application Frameworks层定义好自己的硬件服务HelloService,并提供IHelloService接口提供访问服务。

二.为了方便开发,我们可以在IDE环境下使用Android SDK来开发Android应用程序。开发完成后,再把程序源代码移植到Android源代码工程目录中。使用Eclipse的Android插件ADT创建Android工程很方便,这里不述,可以参考网上其它资料。工程名称为Hello,下面主例出主要文件:

主程序是src/shy/luo/hello/Hello.java:

  1. packageshy.luo.hello;
  2. importshy.luo.hello.R;
  3. importandroid.app.Activity;
  4. importandroid.os.ServiceManager;
  5. importandroid.os.Bundle;
  6. importandroid.os.IHelloService;
  7. importandroid.os.RemoteException;
  8. importandroid.util.Log;
  9. importandroid.view.View;
  10. importandroid.view.View.OnClickListener;
  11. importandroid.widget.Button;
  12. importandroid.widget.EditText;
  13. publicclassHelloextendsActivityimplementsOnClickListener{
  14. privatefinalstaticStringLOG_TAG="shy.luo.renju.Hello";
  15. privateIHelloServicehelloService=null;
  16. privateEditTextvalueText=null;
  17. privateButtonreadButton=null;
  18. privateButtonwriteButton=null;
  19. privateButtonclearButton=null;
  20. /**Calledwhentheactivityisfirstcreated.*/
  21. @Override
  22. publicvoidonCreate(BundlesavedInstanceState){
  23. super.onCreate(savedInstanceState);
  24. setContentView(R.layout.main);
  25. helloService=IHelloService.Stub.asInterface(
  26. ServiceManager.getService("hello"));
  27. valueText=(EditText)findViewById(R.id.edit_value);
  28. readButton=(Button)findViewById(R.id.button_read);
  29. writeButton=(Button)findViewById(R.id.button_write);
  30. clearButton=(Button)findViewById(R.id.button_clear);
  31. readButton.setOnClickListener(this);
  32. writeButton.setOnClickListener(this);
  33. clearButton.setOnClickListener(this);
  34. Log.i(LOG_TAG,"HelloActivityCreated");
  35. }
  36. @Override
  37. publicvoidonClick(Viewv){
  38. if(v.equals(readButton)){
  39. try{
  40. intval=helloService.getVal();
  41. Stringtext=String.valueOf(val);
  42. valueText.setText(text);
  43. }catch(RemoteExceptione){
  44. Log.e(LOG_TAG,"RemoteExceptionwhilereadingvaluefromdevice.");
  45. }
  46. }
  47. elseif(v.equals(writeButton)){
  48. try{
  49. Stringtext=valueText.getText().toString();
  50. intval=Integer.parseInt(text);
  51. helloService.setVal(val);
  52. }catch(RemoteExceptione){
  53. Log.e(LOG_TAG,"RemoteExceptionwhilewritingvaluetodevice.");
  54. }
  55. }
  56. elseif(v.equals(clearButton)){
  57. Stringtext="";
  58. valueText.setText(text);
  59. }
  60. }
  61. }
程序通过ServiceManager.getService("hello")来获得HelloService,接着通过IHelloService.Stub.asInterface函数转换为IHelloService接口。其中,服务名字“hello”是系统启动时加载HelloService时指定的,而IHelloService接口定义在android.os.IHelloService中,具体可以参考在Ubuntu上为Android系统的Application Frameworks层增加硬件访问服务一文。这个程序提供了简单的读定自定义硬件有寄存器val的值的功能,通过IHelloService.getVal和IHelloService.setVal两个接口实现。

界面布局文件res/layout/main.xml:
  1. <?xmlversion="1.0"encoding="utf-8"?>
  2. <LinearLayoutxmlns:android="http://schemas.android.com/apk/res/android"
  3. android:orientation="vertical"
  4. android:layout_width="fill_parent"
  5. android:layout_height="fill_parent">
  6. <LinearLayout
  7. android:layout_width="fill_parent"
  8. android:layout_height="wrap_content"
  9. android:orientation="vertical"
  10. android:gravity="center">
  11. <TextView
  12. android:layout_width="wrap_content"
  13. android:layout_height="wrap_content"
  14. android:text="@string/value">
  15. </TextView>
  16. <EditText
  17. android:layout_width="fill_parent"
  18. android:layout_height="wrap_content"
  19. android:id="@+id/edit_value"
  20. android:hint="@string/hint">
  21. </EditText>
  22. </LinearLayout>
  23. <LinearLayout
  24. android:layout_width="fill_parent"
  25. android:layout_height="wrap_content"
  26. android:orientation="horizontal"
  27. android:gravity="center">
  28. <Button
  29. android:id="@+id/button_read"
  30. android:layout_width="wrap_content"
  31. android:layout_height="wrap_content"
  32. android:text="@string/read">
  33. </Button>
  34. <Button
  35. android:id="@+id/button_write"
  36. android:layout_width="wrap_content"
  37. android:layout_height="wrap_content"
  38. android:text="@string/write">
  39. </Button>
  40. <Button
  41. android:id="@+id/button_clear"
  42. android:layout_width="wrap_content"
  43. android:layout_height="wrap_content"
  44. android:text="@string/clear">
  45. </Button>
  46. </LinearLayout>
  47. </LinearLayout>
字符串文件res/values/strings.xml:
  1. <?xmlversion="1.0"encoding="utf-8"?>
  2. <resources>
  3. <stringname="app_name">Hello</string>
  4. <stringname="value">Value</string>
  5. <stringname="hint">Pleaseinputavalue...</string>
  6. <stringname="read">Read</string>
  7. <stringname="write">Write</string>
  8. <stringname="clear">Clear</string>
  9. </resources>
程序描述文件AndroidManifest.xml:
  1. <?xmlversion="1.0"encoding="utf-8"?>
  2. <manifestxmlns:android="http://schemas.android.com/apk/res/android"
  3. package="shy.luo.hello"
  4. android:versionCode="1"
  5. android:versionName="1.0">
  6. <applicationandroid:icon="@drawable/icon"android:label="@string/app_name">
  7. <activityandroid:name=".Hello"
  8. android:label="@string/app_name">
  9. <intent-filter>
  10. <actionandroid:name="android.intent.action.MAIN"/>
  11. <categoryandroid:name="android.intent.category.LAUNCHER"/>
  12. </intent-filter>
  13. </activity>
  14. </application>
  15. </manifest>
三. 将Hello目录拷贝至packages/experimental目录,新增Android.mk文件:
USER-NAME@MACHINE-NAME:~/Android/packages/experimental$ vi Android.mk
Android.mk的文件内容如下:
LOCAL_PATH:= $(call my-dir)
include $(CLEAR_VARS)
LOCAL_MODULE_TAGS := optional
LOCAL_SRC_FILES := $(call all-subdir-java-files)
LOCAL_PACKAGE_NAME := Hello
include $(BUILD_PACKAGE)
四. 编译:
USER-NAME@MACHINE-NAME:~/Android$ mmmpackages/experimental/Hello
编译成功后,便可以在out/target/product/generic/system/app目录下看到Hello.apk文件了。
五. 重新打包系统镜像文件system.img:
USER-NAME@MACHINE-NAME:~/Android$ make snod
重新打包后的system.img文件就内置了Hello.apk文件了。
六. 运行Android模拟器:
USER-NAME@MACHINE-NAME:~/Android$ emulator -kernel kernel/common/arch/arm/boot/zImage &
在Home Screen中可以看到Hello应用程序:

打开Hello应用程序:


点击Read按钮,可以从HelloService中读取硬件寄存器val的值;点击Clear按钮,可以清空文本框的值;在文本框中输入一个数值,再点击Write按钮,便可以将这个值写入到硬件寄存器val中去,可以再次点击Read按钮来验证是否正确写入了值。
至此,我们就完整地学习了在Android的Linux内核空间添加硬件驱动程序、在Android的硬件抽象层添加硬件接口、在Android的Application Frameworks层提供硬件服务以及在Android的应用层调用硬件服务的整个过程了,希望能为读者进入Android系统提供入门帮助。重新学习整个过程,请参考Android硬件抽象层(HAL)概要介绍和学习计划
分享到:
评论

相关推荐

Global site tag (gtag.js) - Google Analytics