前面的一篇文章《iOS开发16:使用Navigation Controller切换视图》中的小例子在运行时,屏幕上方出现的工具栏就是Navigation Bar,而所谓UINavigationItem就可以理解为Navigation Bar中的内容,通过编辑UINavigationItem,我们可以使得在Navigation Bar中显示想要的东西,比如设置标题、添加按钮等。
这篇博客将会以一个小例子来演示如何设置UINavigationItem。
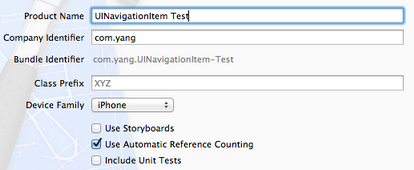
现在我用的是Xcode 4.3,在使用上跟Xcode 4.2差不多。
1、首先运行Xcode 4.3,创建一个Single View Application,名称为UINavigationItem Test:
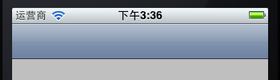
2、其次,我们要使得程序运行时能够显示Navigation Bar:
2.1 单击AppDelegate.h,向其中添加属性:
@property (strong, nonatomic) UINavigationController *navController;
2.2 打开AppDelegate.m,在@synthesize viewController = _viewController;之后添加代码:
@synthesize navController;

#pragma mark -
#pragma mark Application lifecycle
2.3 修改didFinishLaunchingWithOptions方法代码如下:
- (BOOL)application:(UIApplication *)application didFinishLaunchingWithOptions:(NSDictionary *)launchOptions
{
    self.window = [[UIWindow alloc] initWithFrame:[[UIScreen mainScreen] bounds]];
    // Override point for customization after application launch.
    self.viewController = [[ViewController alloc] initWithNibName:@"ViewController" bundle:nil];

    self.navController = [[UINavigationController alloc] initWithRootViewController:self.viewController];
    [self.window addSubview:navController.view];

    [self.window makeKeyAndVisible];
    return YES;
}
此时运行程序,会发现出现了Navigation Bar:
下面讲一下关于NavigationItem的简单设置。
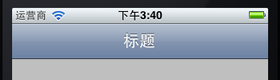
3、设置标题:
打开ViewController.m,在viewDidLoad方法中[super viewDidLoad];之后添加代码:
self.navigationItem.title = @"标题";
运行:
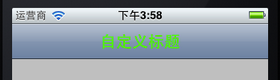
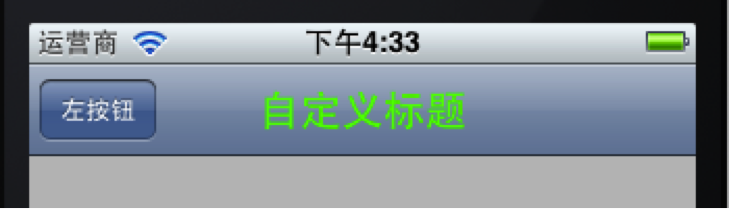
4、自定义标题,设置titleView:
如果我们想改变标题的颜色和字体,就需要自己定义一个UILabel,并且已经设置好这个Label的内容,可以设置自己想要的字体、大小和颜色等。然后执行self.navigationItem.titleView = myLabel;就可以看到想要的效果。
4.1 打开ViewController.h,向其中添加属性:
@property (strong, nonatomic) UILabel *titleLabel;
4.2 打开ViewController.m,在@implementation ViewController下面一行添加代码:
@synthesize titleLabel;
4.3 在viewDidLoad方法中,去掉self.navigationItem.title = @"标题";,并添加代码:
//自定义标题
titleLabel = [[UILabel alloc] initWithFrame:CGRectMake(0, 0 , 100, 44)];
titleLabel.backgroundColor = [UIColor clearColor];  //设置Label背景透明
titleLabel.font = [UIFont boldSystemFontOfSize:20];  //设置文本字体与大小
titleLabel.textColor = [UIColor colorWithRed:(0.0/255.0) green:(255.0 / 255.0) blue:(0.0 / 255.0) alpha:1];  //设置文本颜色
titleLabel.textAlignment = UITextAlignmentCenter;
titleLabel.text = @"自定义标题";  //设置标题
self.navigationItem.titleView = self.titleLabel;
运行:
实际上,不仅仅可以将titleView设置成Label,只要是UIView的对象都可以设为titleView,例如,将4.3中的代码改成:
UIButton *button = [UIButtonbuttonWithType: UIButtonTypeRoundedRect];
[button setTitle: @"按钮" forState: UIControlStateNormal];
[button sizeToFit];
self.navigationItem.titleView = button;
则运行起来效果如下:

5、为Navigation Bar添加左按钮
以下是进行leftBarButtonItem设置的代码:
self.navigationItem.leftBarButtonItem = (UIBarButtonItem *)
self.navigationItem.leftBarButtonItems = (UIBarButtonItem *)
self.navigationItemsetLeftBarButtonItem:(UIBarButtonItem *)
self.navigationItemsetLeftBarButtonItem:(UIBarButtonItem *) animated:(BOOL)
self.navigationItemsetLeftBarButtonItems:(NSArray *)
self.navigationItemsetLeftBarButtonItems:(NSArray *) animated:(BOOL)
其实很简单,只要定义好一个UIBarButtonItem,然后执行上述某行代码就行了。
5.1 为了使得运行时不出错,我们在ViewController.m中添加一个空方法,由将要创建的左右按钮使用:
//空方法
-(void)myAction {

}
5.2 添加一个左按钮:
在ViewDidLoad方法最后添加代码:
//添加左按钮
UIBarButtonItem *leftButton = [[UIBarButtonItem alloc]
                                        initWithTitle:@"左按钮"
                                        style:UIBarButtonItemStylePlain
                                        target:self
                                        action:@selector(myAction)];
[self.navigationItem setLeftBarButtonItem:leftButton];
运行效果如下:
创建一个UIBarButtonItem用的方法主要有:
[UIBarButtonItemalloc]initWithTitle:(NSString *) style:(UIBarButtonItemStyle) target:(id) action:(SEL)
[UIBarButtonItemalloc]initWithBarButtonSystemItem:(UIBarButtonSystemItem) target:(id) action:(SEL)
在第一个方法中,我们可以使用的按钮样式有:
UIBarButtonItemStyleBordered
UIBarButtonItemStyleDone
UIBarButtonItemStylePlain
效果分别如下:


看上去第一个和第三个样式效果是一样的。
6、添加一个右按钮
在ViewDidLoad方法最后添加代码:
//添加右按钮
UIBarButtonItem *rightButton = [[UIBarButtonItem alloc]
                                initWithBarButtonSystemItem:UIBarButtonSystemItemUndo
                                target:self
                                action:@selector(myAction)];
self.navigationItem.rightBarButtonItem = rightButton;
运行如下:

这里创建UIBarButtonItem用的方法是
[UIBarButtonItemalloc]initWithBarButtonSystemItem:(UIBarButtonSystemItem) target:(id) action:(SEL)
用了系统自带的按钮样式,这些样式的标签和效果如下:
|
标签 |
效果 |
标签 |
效果 |
| UIBarButtonSystemItemAction |

|
UIBarButtonSystemItemPause |

|
| UIBarButtonSystemItemAdd |

|
UIBarButtonSystemItemPlay |

|
| UIBarButtonSystemItemBookmarks |

|
UIBarButtonSystemItemRedo |

|
| UIBarButtonSystemItemCamera |

|
UIBarButtonSystemItemRefresh |

|
| UIBarButtonSystemItemCancel |

|
UIBarButtonSystemItemReply |

|
| UIBarButtonSystemItemCompose |

|
UIBarButtonSystemItemRewind |

|
| UIBarButtonSystemItemDone |

|
UIBarButtonSystemItemSave |

|
| UIBarButtonSystemItemEdit |

|
UIBarButtonSystemItemSearch |

|
| UIBarButtonSystemItemFastForward |

|
UIBarButtonSystemItemStop |

|
| UIBarButtonSystemItemOrganize |

|
UIBarButtonSystemItemTrash |

|
| UIBarButtonSystemItemPageCurl |

|
UIBarButtonSystemItemUndo |

|
注意,UIBarButtonSystemItemPageCurl只能在Tool Bar上显示。
7、添加多个右按钮
在ViewDidLoad方法中最后添加代码:
//添加多个右按钮
UIBarButtonItem *rightButton1 = [[UIBarButtonItem alloc]
                                initWithBarButtonSystemItem:UIBarButtonSystemItemDone
                                target:self
                                action:@selector(myAction)];
UIBarButtonItem *rightButton2 = [[UIBarButtonItem alloc]
                                 initWithBarButtonSystemItem:UIBarButtonSystemItemFixedSpace
                                 target:nil
                                 action:nil];
UIBarButtonItem *rightButton3 = [[UIBarButtonItem alloc]
                                 initWithBarButtonSystemItem:UIBarButtonSystemItemEdit
                                 target:self
                                 action:@selector(myAction)];
UIBarButtonItem *rightButton4 = [[UIBarButtonItem alloc]
                                 initWithBarButtonSystemItem:UIBarButtonSystemItemFlexibleSpace
                                 target:nil
                                 action:nil];
UIBarButtonItem *rightButton5 = [[UIBarButtonItem alloc]
                                 initWithBarButtonSystemItem:UIBarButtonSystemItemOrganize
                                 target:self
                                 action:@selector(myAction)];
NSArray *buttonArray = [[NSArray alloc]
                        initWithObjects:rightButton1,rightButton2,
                        rightButton3,rightButton4,rightButton5, nil];
self.navigationItem.rightBarButtonItems = buttonArray;
为了更好的显示效果,把设置titleView以及设置leftBarButtonItem的代码注释掉,运行效果如下:

上面的UIBarButtonSystemItemFixedSpace和UIBarButtonSystemItemFlexibleSpace都是系统提供的用于占位的按钮样式。
8、设置Navigation Bar背景颜色
在viewDidLoad方法后面添加代码:
//设置Navigation Bar颜色
self.navigationController.navigationBar.tintColor = [UIColor colorWithRed:(218.0/255.0) green:(228.0 / 255.0) blue:(250.0 / 255.0) alpha:1];
运行如下:
9、设置Navigation Bar背景图片
首先将准备好作为背景的图片拖到工程中,我用的图片名称是title_bg.png。
将上面的代码改成:
//设置Navigation Bar背景图片
UIImage *title_bg = [UIImage imageNamed:@"title_bg.png"];  //获取图片
CGSize titleSize = self.navigationController.navigationBar.bounds.size;  //获取Navigation Bar的位置和大小
title_bg = [self scaleToSize:title_bg size:titleSize];//设置图片的大小与Navigation Bar相同
[self.navigationController.navigationBar
     setBackgroundImage:title_bg
     forBarMetrics:UIBarMetricsDefault];  //设置背景
之后,在ViewController.m中添加一个方法用于调整图片大小:
//调整图片大小
- (UIImage *)scaleToSize:(UIImage *)img size:(CGSize)size{
    UIGraphicsBeginImageContext(size);
    [img drawInRect:CGRectMake(0, 0, size.width, size.height)];
    UIImage* scaledImage = UIGraphicsGetImageFromCurrentImageContext();
    UIGraphicsEndImageContext();
    return scaledImage;
}
运行:


相关推荐
ios的app的navigation bar的代码的实现。
Chapter 19: Where Am I? Finding Your Way with Core Location and Map Kit Chapter 20: Whee! Gyro and Accelerometer! Chapter 21: The Camera and Photo Library Chapter 22: Application Localization Book ...
IOS7Navigation Bar上的返回按钮文本颜色,箭头颜色以及导航栏按钮的颜色设置
ios TabBar + Navigation纯代码实现 还有许多小例子在代码里
iOS tabbar navigation 控件结合实例。可以看下,很有参考价值。强烈推荐。
world podcast client sample application-completely new for this edition-featuring Internet access, tables, navigation, and media playback, all with the most modern approaches provided by Apple's iOS ...
IOS应用源码——Navigation(导航控制器).zip
在iOS5.0以上版本,要想navigation bar上面也能显示木质图片,要更改“WoodUINavigationAppDelegate.m”文件的一段代码:[navigationController.navigationBar insertSubview:imageView atIndex:0];改成:...
IOS应用源码——Navigation.zip
Toolbars, navigation controllers, and split view controllers Using Auto Layout to scale user interfaces Using Dynamic Type to scale fonts Localization and Internationalization Block syntax and use ...
android navigation bar 的一些资料
iOS开发基础框架 及 推荐实践,目的在于帮助开发者更快的开发iOS程序。 使用了MVVM架构,以及面向切面编程,最低版本 iOS 7.0,主要使用Objective C语言。 为什么使用 MVVM MVVM 可以兼容你当下使用的 MVC 架构 MVVM...
IOS应用源码——Navigation(导航控制器).rar
博文http://blog.csdn.net/m_changgong/article/details/8209309源代码
IOS应用源码——Navigation + 分組tableView的DemoNavigation 2.zip
根据网上资源修改的包含侧滑菜单,TabBar,导航Controll和PagerView的iOS应用框架,侧滑菜单可以直接控制切换TabBar Controller,可以作为iOS应用的基础框架。
苹果iOS是由苹果公司开发的手持设备操作系统。苹果公司最早于2007年1月9日的Macworld大会上公布这个系统,最初是设计给iPhone使用的,后来陆续套用到iPod touch、iPad以及Apple TV等苹果产品上。iOS与苹果的Mac OS X...
包含前端、后端、移动开发、操作系统、人工智能、物联网、信息化管理、数据库、硬件开发、大数据、课程资源、音视频、网站开发等各种技术项目的源码。 包括STM32、ESP8266、PHP、QT、Linux、iOS、C++、Java、python...
英文版的PDF,中文名称[iOS5开发基础教程],中文版9月份才出版,先看英文版吧,原汁原味。从电驴下载的,看了一下,内容很不错。京东上对应这本书的介绍:http://book.360buy.com/11073790.html 中文名: iOS5开发...