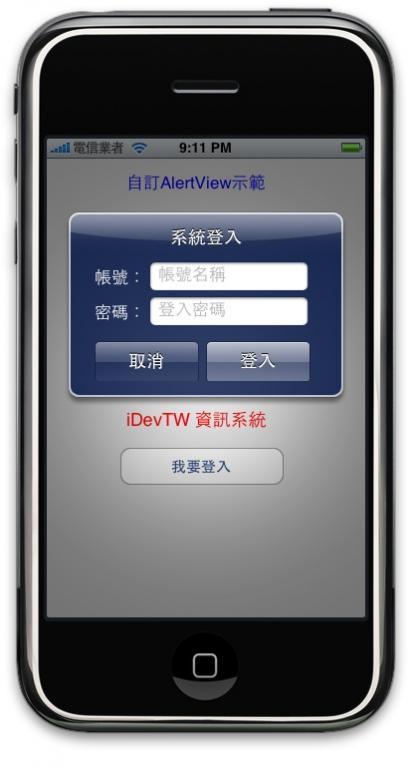
說明:示範如何利用AlertView來製作系統登入的介面
示範:
程式碼:
CustomAlertViewViewController.h
-
#import <UIKit/UIKit.h>
-
-
//記得加入UIAlertViewDelete
-
@interface CustomAlertViewViewController :UIViewController<UIAlertViewDelegate>
{
-
UIAlertView *myAlertView;
-
}
-
-
@property (nonatomic,retain) UIAlertView *myAlertView;
-
-
-(IBAction) buttonPressed:(id)sender;
-
-
@end
複製代碼
CustomAlertViewViewController.m
-
-(IBAction) buttonPressed:(id)sender{
-
myAlertView=[[UIAlertView alloc] initWithTitle:@"系統登入" message:nil delegate:self cancelButtonTitle:@"取消"
otherButtonTitles:@"登入",nil];
-
[myAlertView show];
-
[myAlertView release];
-
-
}
-
-
- (void)willPresentAlertView:(UIAlertView *)alertView
-
{
-
CGRect frame = alertView.frame;
-
if( alertView==myAlertView )
-
{
-
frame.origin.y -= 120;
-
frame.size.height += 80;
-
alertView.frame = frame;
-
for( UIView *viewin alertView.subviews )
-
{
-
//列舉alertView中所有的物件
-
if( ![view isKindOfClass:[UILabelclass]] )
-
{
-
//若不UILable則另行處理
-
if (view.tag==1)
-
{
-
//處理第一個按鈕,也就是 CancelButton
-
CGRect btnFrame1 =CGRectMake(30, frame.size.height-65, 105, 40);
-
view.frame = btnFrame1;
-
-
} else if(view.tag==2){
-
//處理第二個按鈕,也就是otherButton
-
CGRect btnFrame2 =CGRectMake(142, frame.size.height-65, 105, 40);
-
view.frame = btnFrame2;
-
}
-
}
-
}
-
-
//加入自訂的label及UITextFiled
-
UILabel *lblaccountName=[[UILabel alloc] initWithFrame:CGRectMake( 30, 50,60, 30 )];;
-
lblaccountName.text=@"帳號:";
-
lblaccountName.backgroundColor=[UIColor clearColor];
-
lblaccountName.textColor=[UIColor whiteColor];
-
-
UITextField *accoutName = [[UITextField alloc] initWithFrame: CGRectMake( 85, 50,160, 30 )];
-
accoutName.placeholder = @"帳號名稱";
-
accoutName.borderStyle=UITextBorderStyleRoundedRect;
-
-
-
UILabel *lblaccountPassword=[[UILabel alloc] initWithFrame:CGRectMake( 30, 85,60, 30 )];;
-
lblaccountPassword.text=@"密碼:";
-
lblaccountPassword.backgroundColor=[UIColor clearColor];
-
lblaccountPassword.textColor=[UIColor whiteColor];
-
-
UITextField *accoutPassword = [[UITextField alloc] initWithFrame: CGRectMake( 85, 85,160, 30 )];
-
accoutPassword.placeholder = @"登入密碼";
-
accoutPassword.borderStyle=UITextBorderStyleRoundedRect;
-
//輸入的資料以星號顯示(密碼資料)
-
accoutPassword.secureTextEntry=YES;
-
-
[alertView addSubview:lblaccountName];
-
[alertView addSubview:accoutName];
-
[alertView addSubview:lblaccountPassword];
-
[alertView addSubview:accoutPassword];
-
}
-
}
-
-
- (void)dealloc {
-
[myAlertView release];
-
[super dealloc];
-
}
複製代碼
|


相关推荐
Demo 和 AnimateGif 详见Github https://github.com/hkm5558/KMAlertView 求Star
vue-ios-alertview Vue 2的iOS7 +样式Alertview服务angular-ios-alertview的Vue端口。 安装npm install vue-ios-alertview依赖关系Promise用法从'vue'导入Vue; 导入vue-ios-alertview的Vue 2的iOS7 +样式Alertview...
自定义alertView,支持ios7,大家可以参考一下
自定义三种状态的AlertView--成功、警告、错误,可以直接调用,采用动画效果炫酷
适用于iOSSDK的自定义AlertView。_Objective-C_Ruby_下载.zip
DXAlertView-master是一个提示框类
快速实现自定义alertView
自定义alertview,一款封装好的自定义alertview控件,多样化alertview的使用
vue-ios-alertview是iOS7 风格的alertview服务,angular-ios-alertview的Vue移植
1.)//登录输入框类型alertView-- +(void)showAlertLoginInputWithMessage:(NSString*)message title:(NSString*)title cancelButtonTitle:(NSString *)cancelButtonTitle otherButtonTitles:(NSArray *)...
想象不到的便捷,用过的都说好...在原BlockAlertView的基础上,新增了PlainText样式的alertView. 利用Block进行回调,一句代码就可以完成alertView的创建和代理方法。再也不需要去写tag属性来区分alertView的点击事件了
ConfigueAlertView *alertView = [[ConfigueAlertView alloc] initWithFrame:CGRectMake(0, 0, ScreenWidth, ScreenHeight)withGroupNumber:10]; alertView.delegate = self; alertView.backgroundColor = ...
自定义alertView弹出框
自定义 AlertView
iOS 自定义AlertView,使用简单
自定义alertView;支持带图标,自定义视图的alertView
可以网络加载图片可网络加载文字,可自定义alertView颜色等等,东西很简单,但是我对颜色不敏感,所有设置的颜色不那么亮眼,代码很容易看懂,自己修改也方便。里面包含了mas框架。。
带tableView的AlertView,用于选择用户等场景。