еҺҹй“ҫжҺҘ:http://blog.csdn.net/k_linux_man/article/details/7023824
иҪ¬иҪҪжіЁжҳҺеҮәеӨ„,дҪңиҖ…пјҡK_Linux_Man
ејҖеҸ‘е№іеҸ°пјҡfarsight s5pc100-a
еҶ…ж ёпјҡlinux2.6.29
зҺҜеўғжҗӯй…ҚпјҡжңүеҚҡж–Үд»Ӣз»Қ
ејҖеҸ‘зҺҜеўғпјҡUbuntu гҖҒEclipse
йҰ–е…Ҳејәи°ғдёҖдёӢиҰҒзӮ№пјҡ
1.зј–еҶҷandroidй©ұеҠЁж—¶пјҢйҰ–е…Ҳе…ҲиҰҒе®ҢжҲҗlinuxй©ұеҠЁпјҢеӣ дёәandroidй©ұеҠЁе…¶е®һжҳҜеңЁlinuxй©ұеҠЁеҹәзЎҖд№ӢдёҠе®ҢжҲҗдәҶHALеұӮпјҲ硬件жҠҪиұЎеұӮпјүпјҢеҰӮжһңжғіиҰҒжөӢиҜ•зҡ„иҜқпјҢиҮӘе·ұд№ҹиҰҒзј–еҶҷjavaзЁӢеәҸжқҘжөӢиҜ•дҪ зҡ„й©ұеҠЁгҖӮ
2.androidзҡ„ж №ж–Ү件系з»ҹжҳҜeclair_2.1зүҲжң¬гҖӮжҲ‘дјҡдёҠдј еҒҡеҘҪзҡ„ж №ж–Ү件系з»ҹжҸҗдҫӣеӨ§е®¶гҖӮиҝҷйҮҢиҰҒиҜҙзҡ„жҳҜпјҢandroidеә•еұӮеҶ…ж ёиҝҳжҳҜlinuxзҡ„еҶ…ж ёпјҢеҸӘжҳҜиҝӣиЎҢдәҶдёҖдәӣиЈҒеүӘгҖӮеҒҡеҘҪзҡ„linuxеҶ…ж ёй•ңеғҸпјҢиҝҷдёӘжҲ‘д№ҹдјҡдёҠдј з»ҷеӨ§е®¶гҖӮandroidиҮӘе·ұеҒҡдәҶдёҖеҘ—ж №ж–Ү件系з»ҹпјҢиҝҷжүҚжҳҜandroidиҮӘе·ұеҒҡзҡ„дёңиҘҝгҖӮandroidдәӢе®һдёҠеҸӘжҳҜеҒҡдәҶдёҖеҘ—ж №ж–Ү件系з»ҹзҪўдәҶгҖӮ
еҒҮи®ҫlinuxй©ұеҠЁеӨ§е®¶йғҪе·Із»ҸеҒҡеҘҪдәҶгҖӮжҲ‘жқҝеӯҗдёҠжңүеӣӣдёӘзҒҜпјҢйҖҡиҝҮioctlжҺ§еҲ¶еӣӣдёӘзҒҜпјҢз»ҷе®ҡдёҚеҗҢзҡ„еҸӮж•°пјҢзӮ№дә®дёҚеҗҢзҡ„зҒҜгҖӮ
linuxй©ұеҠЁд»Јз Ғеӣ е№іеҸ°дёҚеҗҢиҖҢжңүжүҖдёҚеҗҢпјҢиҝҷе°ұдёҚй»Ҹд»Јз ҒдәҶгҖӮ
иҝҷжҳҜжҲ‘жөӢиҜ•linuxй©ұеҠЁзј–еҶҷзҡ„й©ұеҠЁпјҢд»Јз ҒеҰӮдёӢпјҡ
-
#include<stdio.h>
-
#include<stdlib.h>
-
#include<unistd.h>
-
#include<fcntl.h>
-
#include<string.h>
-
#include<sys/types.h>
-
#include<sys/stat.h>
-
#include<sys/ioctl.h>
-
#defineLED_ON_IO('k',1)
-
#defineLED_OFF_IO('k',2)
-
intmain()
-
{
-
inti=0;
-
intdev_fd;
-
dev_fd=open("/dev/led",O_RDWR);
-
if(dev_fd==-1){
-
printf("Cann'topenfile/dev/led\n");
-
exit(1);
-
}
-
while(1)
-
{
-
ioctl(dev_fd,LED_ON,1);
-
sleep(1);
-
ioctl(dev_fd,LED_OFF,1);
-
sleep(1);
-
ioctl(dev_fd,LED_ON,2);
-
sleep(1);
-
ioctl(dev_fd,LED_OFF,2);
-
sleep(1);
-
ioctl(dev_fd,LED_ON,3);
-
sleep(1);
-
ioctl(dev_fd,LED_OFF,3);
-
sleep(1);
-
ioctl(dev_fd,LED_ON,4);
-
sleep(1);
-
ioctl(dev_fd,LED_OFF,4);
-
sleep(1);
-
-
}
-
return0;
-
}
дёӢйқўејҖе§ӢжҠҠlinuxй©ұеҠЁе°ҒиЈ…жҲҗandroidй©ұеҠЁгҖӮ
йҰ–е…Ҳд»Ӣз»ҚдёҖдёӢandroidй©ұеҠЁз”ЁеҲ°зҡ„дёүдёӘйҮҚиҰҒзҡ„з»“жһ„дҪ“пјҢ
struct hw_module_t;
struct hw_device_t;
struct hw_module_methods_t;
androidжәҗз ҒйҮҢйқўз»“жһ„дҪ“зҡ„еЈ°жҳҺ
-
typedefstructhw_module_t{
-
-
uint32_ttag;
-
-
uint16_tversion_major;
-
-
uint16_tversion_minor;
-
-
constchar*id;
-
-
constchar*name;
-
-
constchar*author;
-
-
consthw_module_methods_t*methods;
-
-
void*dso;
-
-
uint32_treserved[32-7];
-
-
}hw_module_t;
-
typedefstructhw_device_t{
-
-
uint32_ttag;
-
-
uint32_tversion;
-
-
structhw_module_t*module;
-
-
uint32_treserved[12];
-
-
int(*close)(structhw_device_t*device);
-
-
}hw_device_t;
-
typedefstructhw_module_methods_t{
-
-
int(*open)(conststructhw_module_t*module,constchar*id,
-
-
structhw_device_t**device);
-
-
}hw_module_methods_t;
жҲ‘们з»Ҹеёёдјҡз”ЁеҲ°иҝҷдёүдёӘз»“жһ„дҪ“гҖӮ
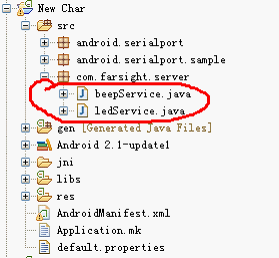
androidй©ұеҠЁзӣ®еҪ•з»“жһ„:
led
|--- hal
||----jni
||----- Android.mk
| |----com_farsgiht_server_ledServer.cpp
||----stub
||---- include
|||-----led.h
||-----module
||-----Android.mk
||-----led.c
|--- linux_drv
йҰ–е…ҲжҲ‘们иҰҒзј–еҶҷдёҖдёӘstubпјҲд»ЈзҗҶпјүпјҢд»ЈзҗҶзҡ„ж„ҸжҖқжҳҜпјҢй’ҲеҜ№дҪ жүҖзү№жңүзҡ„и®ҫеӨҮпјҢдҪ жүҫдёҖдёӘд»ЈзҗҶдәәе°ұеҸҜд»Ҙеё®дҪ е®ҢжҲҗпјҢе®ғжҳҜж“ҚдҪңlinuxй©ұеҠЁзҡ„第дёҖеұӮгҖӮ
зј–еҶҷеӨҙж–Ү件пјҢеҗҚеӯ—led.h
д»Јз ҒеҰӮдёӢ;
-
#include<hardware/hardware.h>
-
#include<fcntl.h>
-
#include<errno.h>
-
#include<cutils/log.h>
-
#include<cutils/atomic.h>
-
-
-
#defineLED_HARDWARE_MODULE_ID"led"
-
-
-
structled_module_t{
-
structhw_module_tcommon;
-
};
-
-
structled_control_device_t{
-
structhw_device_tcommon;
-
-
int(*set_on)(structled_control_device_t*dev,intarg);
-
int(*set_off)(structled_control_device_t*dev,intarg);
-
};
-
-
-
structled_control_context_t{
-
structled_control_device_tdevice;
-
};
struct hw_module_t sturct hw_device_t иҝҷдёӨдёӘз»“жһ„дҪ“дёҚиғҪзӣҙжҺҘдҪҝз”ЁпјҢжүҖд»ҘиҝӣиЎҢдәҶдёҖдёӢе°ҒиЈ…пјҲ继жүҝпјүгҖӮ
led_module_t 继жүҝ hw_module_t
led_control_device_t 继жүҝ hw_device_t
led_control_context_t 继жүҝ led_control_device_t
еңЁled_control_device_t з»“жһ„дҪ“жңүеҮҪж•°жҢҮй’Ҳзҡ„еЈ°жҳҺпјҢеӣ дёәеҗҺйқўд»Јз Ғдёӯдјҡз»ҷиҝҷдәӣеҮҪж•°жҢҮй’ҲиөӢеҖј
зј–еҶҷled.c
д»Јз ҒеҰӮдёӢпјҡ
-
#defineLOG_TAG"LedStub"
-
#include<hardware/hardware.h>
-
#include<fcntl.h>
-
#include<errno.h>
-
#include<cutils/log.h>
-
#include<cutils/atomic.h>
-
#include<sys/ioctl.h>
-
#include"../include/led.h"
-
-
-
#defineLED_ON_IO('k',1)
-
#defineLED_OFF_IO('k',2)
-
-
intfd;
-
-
staticintled_set_on(structled_control_device_t*dev,intarg)
-
{
-
LOGI("led_set_on");
-
ioctl(fd,LED_ON,arg);
-
return0;
-
}
-
-
staticintled_set_off(structled_control_device_t*dev,intarg)
-
{
-
LOGI("led_set_off");
-
ioctl(fd,LED_OFF,arg);
-
return0;
-
}
-
-
staticintled_device_close(structhw_device_t*device)
-
{
-
structled_control_context_t*context=(structled_control_context_t*)device;
-
if(context)free(context);
-
close(fd);
-
return0;
-
}
-
-
-
staticintled_device_open(conststructhw_module_t*module,constchar*name,
-
structhw_device_t**device)
-
{
-
structled_control_context_t*context;
-
LOGD("led_device_open");
-
context=(structled_control_context_t*)malloc(sizeof(*context));
-
memset(context,0,sizeof(*context));
-
-
context->device.common.tag=HARDWARE_DEVICE_TAG;
-
context->device.common.version=0;
-
context->device.common.module=module;
-
context->device.common.close=led_device_close;
-
-
context->device.set_on=led_set_on;
-
context->device.set_off=led_set_off;
-
-
*device=(structhw_device_t*)&(context->device);
-
-
if((fd=open("/dev/led",O_RDWR))==-1)
-
{
-
LOGI("ERROR:open");
-
}else{
-
LOGI("openleddeviceok\n");
-
}
-
-
return0;
-
}
-
-
staticstructhw_module_methods_tled_module_methods={
-
open:led_device_open
-
};
-
-
-
conststructled_module_tHAL_MODULE_INFO_SYM={
-
common:{
-
tag:HARDWARE_MODULE_TAG,
-
version_major:1,
-
version_minor:0,
-
id:LED_HARDWARE_MODULE_ID,
-
name:"led_stub",
-
author:"K_Linux_Man",
-
methods:&led_module_methods,
-
},
-
};
йҰ–е…Ҳе…ҲзңӢ struct led_module_t HAL_MODULE_INFO_SYMгҖӮиҝҷдёӘз»“жһ„дҪ“зҡ„еҗҚеӯ—еҝ…йЎ»жҳҜиҝҷдёӘеҗҚеӯ—пјҢеҗҰеҲҷзі»з»ҹж— жі•жүҫеҲ°led_module_tиҝҷдёӘз»“жһ„дҪ“гҖӮ
然еҗҺеҜ№led_module_t йҮҢзҡ„жҲҗе‘ҳhw_module_tз»“жһ„дҪ“иөӢеҖјгҖӮжңҖе…ій”®зҡ„дёәidе’ҢmethodsдёӨдёӘжҲҗе‘ҳзҡ„иөӢеҖјпјҢidеҝ…йЎ»иҰҒиөӢеҖјпјҢеӣ дёәеҗҺйқўжңүдёӘеҮҪж•°иҰҒжүҫеҲ°hw_module_tе°ұжҳҜйҖҡиҝҮidеҸ·еҺ»жүҫзҡ„гҖӮ methodsиў«иөӢеҖјд№ӢеҗҺпјҢдёҠеұӮзҡ„jniжүҚиғҪеҺ»и°ғз”ЁгҖӮ
жҺҘзқҖзңӢmethods з»“жһ„дҪ“йҮҢзҡ„жҲҗе‘ҳе°ұдёҖдёӘпјҢopenеҮҪж•°жҢҮй’ҲпјҢеҜ№иҝҷдёӘеҮҪж•°жҢҮй’ҲиҝӣиЎҢдәҶиөӢеҖјпјҢиөӢдәҶled_device_openеҮҪж•°пјҢиҝҷдёӘеҮҪж•°е®һзҺ°зҡ„дё»иҰҒе°ұжҳҜеҲҶй…Қled_control_context_tз»“жһ„дҪ“з©әй—ҙпјҢ并еҜ№жҲҗе‘ҳиҝӣиЎҢиөӢеҖјгҖӮжіЁж„Ҹhw_device_t йҮҢзҡ„жҲҗе‘ҳmoduleгҖҒcloseеҝ…йЎ»иөӢеҖјгҖӮ
еҮҪж•°жҢҮй’ҲиөӢеҖјпјҡ
context->device.set_on = led_set_on;
context->device.set_off = led_set_off;
дёӢйқўиҝҷеҸҘиҜқзҡ„з”Ёж„ҸжҳҜпјҢдј иҝӣжқҘзҡ„deviceжҢҮй’ҲиөӢдәҲж–°зҡ„еҖјпјҢеҸӘиҰҒи°ғз”ЁиҝҷдёӘеҮҪж•°пјҢдј иҝӣжқҘзҡ„дәҢзә§жҢҮй’ҲжүҖжҢҮеҗ‘зҡ„дёҖзә§жҢҮй’Ҳе°ұжңүеҖјдәҶпјҲдәҢзә§жҢҮй’Ҳж”№еҸҳдәҶдёҖзә§жҢҮй’Ҳзҡ„жҢҮеҗ‘пјҢдҪ еҸҜд»ҘзңӢжҲ‘еҶҷзҡ„ int*p е’Ң int **p еҚҡж–ҮпјүгҖӮ
*device = (struct hw_device_t *)&(context->device);
жҺҘзқҖе°ұжҳҜжү“ејҖи®ҫеӨҮж–Ү件,еҫ—еҲ°fd
led_set_on();йҮҢйқўи°ғз”Ёioctl;
led_set_off();йҮҢйқўи°ғз”Ёioctl;
жҺҘдёӢжқҘеҶҷjniдәҶгҖӮгҖӮcom_farsight_server_ledServer.cppж–Ү件
ж–Ү件代з Ғпјҡ
-
#defineLOG_TAG"ledService"
-
-
#include"utils/Log.h"
-
#include<stdlib.h>
-
#include<string.h>
-
#include<unistd.h>
-
#include<assert.h>
-
#include<jni.h>
-
#include"../stub/include/led.h"
-
-
-
staticled_control_device_t*sLedDevice=NULL;
-
-
-
staticjintled_set_on(JNIEnv*env,jobjectthiz,jintarg)
-
{
-
if(sLedDevice){
-
LOGI("led_set_on");
-
sLedDevice->set_on(sLedDevice,(int)arg);
-
}else{
-
LOGI("sLedDeviceisNULL");
-
};
-
return0;
-
}
-
-
staticjintled_set_off(JNIEnv*env,jobjectthiz,jintarg)
-
{
-
if(sLedDevice){
-
LOGI("led_set_off");
-
sLedDevice->set_off(sLedDevice,(int)arg);
-
}else{
-
LOGI("sLedDeviceisnull");
-
}
-
return0;
-
}
-
-
-
-
staticinlineintled_control_open(conststructhw_module_t*module,
-
structled_control_device_t**device)
-
{
-
LOGI("led_control_open");
-
returnmodule->methods->open(module,LED_HARDWARE_MODULE_ID,
-
(structhw_device_t**)device);
-
}
-
-
-
staticjintled_init(JNIEnv*env,jclassclazz)
-
{
-
led_module_tconst*module;
-
LOGI("led_init");
-
-
if(hw_get_module(LED_HARDWARE_MODULE_ID,(consthw_module_t**)&module)==0){
-
LOGI("getModuleOK");
-
if(led_control_open(&module->common,&sLedDevice)!=0){
-
LOGI("led_initerror");
-
return-1;
-
}
-
}
-
LOGI("led_initsuccess");
-
return0;
-
-
}
-
-
-
staticconstJNINativeMethodgMethods[]={
-
{"_init","()Z",(void*)led_init},
-
{"_set_on","(I)I",(void*)led_set_on},
-
{"_set_off","(I)I",(void*)led_set_off},
-
};
-
-
staticintregisterMethods(JNIEnv*env){
-
staticconstchar*constkClassName=
-
"com/farsight/server/ledService";
-
jclassclazz;
-
clazz=env->FindClass(kClassName);
-
if(clazz==NULL){
-
LOGE("Can'tfindclass%s\n",kClassName);
-
return-1;
-
}
-
-
if(env->RegisterNatives(clazz,gMethods,
-
sizeof(gMethods)/sizeof(gMethods[0]))!=JNI_OK)
-
{
-
LOGE("failedregisteringmethodsfor%s\n",kClassName);
-
return-1;
-
}
-
-
return0;
-
}
-
-
-
jintJNI_OnLoad(JavaVM*vm,void*reserved){
-
JNIEnv*env=NULL;
-
jintresult=-1;
-
LOGI("JNI_onLoad");
-
-
if(vm->GetEnv((void**)&env,JNI_VERSION_1_4)!=JNI_OK){
-
LOGE("ERROR:jni_onload()\n");
-
gotofail;
-
}
-
-
assert(env!=NULL);
-
if(registerMethods(env)!=0){
-
LOGE("ERROR:registerMethod()\n");
-
gotofail;
-
}
-
-
result=JNI_VERSION_1_4;
-
-
fail:
-
returnresult;
-
}
еңЁjniйҮҢйҰ–е…ҲеҠ иҪҪjniеә“ж–Ү件зҡ„ж—¶еҖҷе…ҲиҰҒи°ғз”ЁJNI_OnLoadеҮҪж•°пјҢйҖҡиҝҮзі»з»ҹеҮҪж•°GetEnvи®©envжҢҮй’ҲиҺ·еҫ—жңүж•Ҳзҡ„еҖјгҖӮ然еҗҺжҺҘзқҖи°ғз”ЁregisterMethodsеҮҪж•°пјҢиҝҷдёӘеҮҪж•°жҳҜиҮӘе·ұе®ҡд№үдёҖдёӘеҮҪж•°гҖӮ
static const char * const kClassName = "com/farsight/server/ledService"; зұ»еҗҚдёҺEclipseдёӢејҖеҸ‘еҜ№еә”зҡ„еҢ…дёҖиҮҙгҖӮдёҚиҝҮзӮ№жҚўжҲҗдәҶдёӢеҲ’зәҝгҖӮ
然еҗҺжүҫеҲ°еҜ№еә”зҡ„зұ»пјҢжҺҘзқҖе°ұжҳҜеҗ‘зі»з»ҹжіЁеҶҢNativeеҮҪж•°пјҲNative InterfaceеҚіжң¬ең°жҺҘеҸЈеҮҪж•°пјүпјҢеҮҪж•°еҲ—иЎЁgMethodsйҮҢ _initжҳҜдёҠеұӮframeworkеҺ»еҠ иҪҪеә“ж—¶еҖҷи°ғз”Ёзҡ„пјҢеҪ“дёҠеұӮи°ғз”Ё_initж—¶пјҢдёҺд№ӢеҜ№еә”и°ғз”Ёзҡ„еҮҪж•°е°ұжҳҜled_init, ()Zзҡ„ж„ҸжҖқжҳҜеҮҪж•°led_initеҸӮж•°дёәз©әпјҢиҝ”еӣһдёәз©әгҖӮиҝҷйҮҢе…¶е®һе°ұжҳҜеҒҡдәҶдёҖдёӘеҮҪж•°зҡ„жҳ е°„пјҢдёҠеұӮз”Ёзҡ„javaеҮҪж•°пјҢеңЁиҝҷйҮҢдёҺд№ӢеҜ№еә”жҲҗc еҮҪж•°гҖӮ
еҗҢзҗҶпјҢе…¶дҪҷзҡ„_set_on _set_offе°ұдёҚеҝ…иөҳиҝ°гҖӮ
еңЁи°ғз”Ёled_init()еҮҪж•°ж—¶пјҢзі»з»ҹжҳҜеҰӮдҪ•жүҫеҲ°дёҺд№ӢеҜ№еә”зҡ„stubзҡ„е‘ўпјҲд№ҹе°ұжҳҜеҰӮдҪ•жүҫеҲ°hw_module_tз»“жһ„дҪ“зҡ„е‘ўпјүпјҹдё»иҰҒзҡ„еҮҪж•°е°ұжҳҜhw_get_moduleиҝҷдёӘеҮҪж•°жҳҜйҖҡиҝҮ第дёҖдёӘеҸӮж•°IDеҸ·пјҢжүҫеҲ°зі»з»ҹйҮҢе·Із»ҸеӯҳеңЁзҡ„дёҺд№ӢеҜ№еә”idеҸ·зҡ„stubпјҲеҚіled_module_t HAL_MODULE_INFO_SYM з»“жһ„дҪ“еҸҳйҮҸпјүпјҢ第дәҢдёӘеҸӮж•°е°ұдј иҝӣеҺ»зҡ„дәҢзә§жҢҮй’ҲпјҢи®©moduleиҺ·еҸ–жңүж•Ҳзҡ„еҖјпјҢ
жҺҘзқҖи°ғз”Ё led_control_open,иҝҷдёӘеҮҪж•°жҳҜеҶ…иҒ”еҮҪж•°пјҢеҮҪж•°йҮҢйқўжҺҘзқҖи°ғз”ЁдәҶHAL_MODULE_INFO_SYM йҮҢзҡ„methodsпјҢmethodsйҮҢе°ұдёҖдёӘжҲҗе‘ҳopenпјҢе…¶е®һе‘ўе°ұжҳҜи°ғз”ЁдәҶled.cпјҲstubпјүзҡ„led_device_openеҮҪж•°пјҢsLedDeviceжҢҮй’ҲжҳҜдёҖдёӘе…ЁеұҖеҸҳйҮҸпјҢз»ҸиҝҮиҝҷдёӘеҮҪж•°зҡ„и°ғз”ЁпјҢsLedDeviceе°ұиҺ·еҫ—дәҶhw_deive_tзҡ„ең°еқҖпјҲsLedDeviceжҢҮеҗ‘дәҶhw_device_tпјүгҖӮ
жң¬жқҘдёҖдёӘжҢҮй’ҲжІЎжңүеҖјпјҢдҪҶжҳҜйҖҡиҝҮдј иҝӣеҺ»дәҢзә§жҢҮй’ҲпјҢе°ұиғҪи®©еҺҹжқҘдёәз©әзҡ„жҢҮй’ҲиҺ·еҫ—жңүж•Ҳзҡ„еҖјпјҢдҪ еҸҜд»ҘеҸӮиҖғжҲ‘еҶҷзҡ„еҚҡж–Ү int*pе’Ң int **pпјҢеҜ№дҪ 们зҗҶи§ЈдәҢзә§жҢҮй’Ҳж”№еҸҳдёҖзә§жҢҮй’ҲжҢҮеҗ‘жңүеё®еҠ©гҖӮ既然еңЁjniеұӮиғҪеӨҹиҺ·еҫ—stubйҮҢзҡ„hw_module_t е’Ң hw_device_tпјҢйӮЈд№ҲеҺ»и°ғз”ЁstubйҮҢзҡ„еҮҪж•°д№ҹе°ұдёҚжҳҜй—®йўҳдәҶгҖӮ
жҺҘдёӢжқҘе°ұжҳҜеҺ»е®һзҺ°frameworkеұӮдәҶпјҢframewеұӮйҮҢзҡ„serviceеҺ»и°ғз”Ёjniзҡ„гҖӮframeworkеұӮйҮҢзҡ„serviceжҳҜеңЁeclipseдёӢејҖеҸ‘зҡ„гҖӮ
ж–Ү件еҗҚпјҡledService.java
д»Јз Ғпјҡ
-
packagecom.farsight.server;
-
-
importandroid.util.Log;
-
-
publicclassledService{
-
static{
-
Log.i("ledService","LoadNativeserviceLIB");
-
System.loadLibrary("led_runtime");
-
}
-
publicledService(){
-
Log.i("JavaService","doinitNativeCall");
-
_init();
-
}
-
publicbooleanset_on(intarg){
-
if(0==_set_on(arg)){
-
returntrue;
-
}else{
-
returnfalse;
-
}
-
}
-
-
publicbooleanset_off(intarg){
-
if(0==_set_off(arg)){
-
returntrue;
-
}else{
-
returnfalse;
-
}
-
}
-
-
privatestaticnativeboolean_init();
-
privatestaticnativeint_set_on(intarg);
-
privatestaticnativeint_set_off(intarg);
-
}
private static native boolean _init();
private static native int _set_on(int arg);
private static native int _set_off(int arg);
иҝҷйҮҢзҡ„дёүдёӘеҮҪж•°пјҢе°ұжҳҜеңЁjniйҮҢеЈ°жҳҺзҡ„native interfaceжҺҘеҸЈеҮҪж•°гҖӮ
еҪ“еЈ°жҳҺдёҖдёӘledServiceзҡ„еҜ№иұЎж—¶пјҢstaticйҮҢзҡ„еҮҪж•°еә“дјҡеҠ иҪҪпјҢй»ҳи®Өзҡ„и·Ҝеҫ„е°ұжҳҜеҺ»еҠ иҪҪ/system/libдёӢдёҺд№ӢеҜ№еә”зҡ„еә“пјҢејәи°ғдёҖзӮ№е°ұжҳҜпјҢled_runtimeзңҒеҺ»дәҶеүҚйқўзҡ„libе’ҢеҗҺзјҖ.soгҖӮ
иҝҷж ·пјҢжҲ‘们еҺ»и°ғз”Ёjniзҡ„ж—¶еҖҷе°ұиғҪжҲҗеҠҹпјҢеҗҰеҲҷдјҡеӨұиҙҘгҖӮ
е…¶дҪҷзҡ„е°ұжҳҜеңЁеә”з”ЁзЁӢеәҸйҮҢеЈ°жҳҺдёҖдёӘledServiceеҜ№иұЎпјҢ然еҗҺи°ғз”ЁеҜ№иұЎйҮҢзҡ„set_on е’Ң set_off е°ұеҸҜд»ҘдәҶгҖӮеҸҜд»ҘиҮӘе·ұеҶҷдёҖдёӘеә”з”ЁзЁӢеәҸеҺ»жөӢиҜ•дёҖдёӢгҖӮ
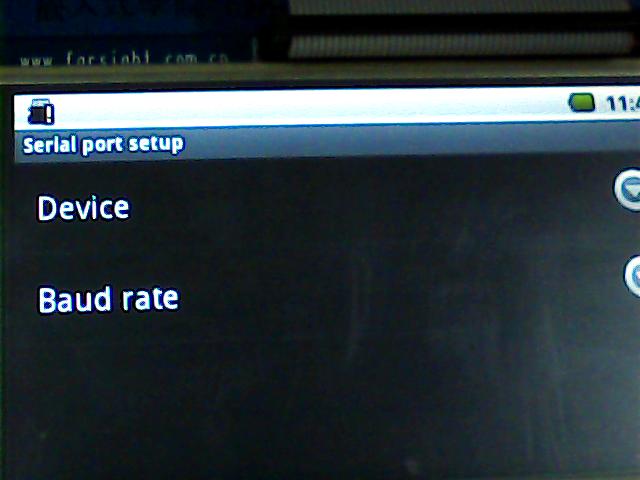
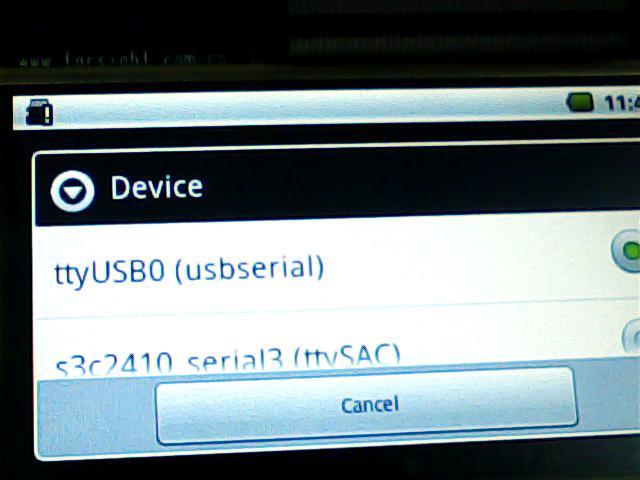
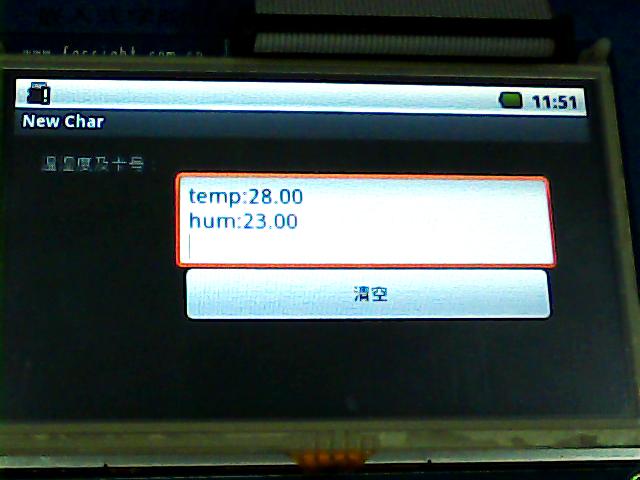
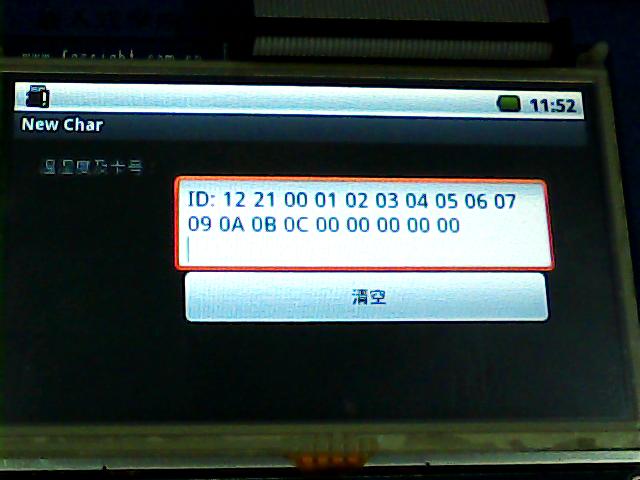
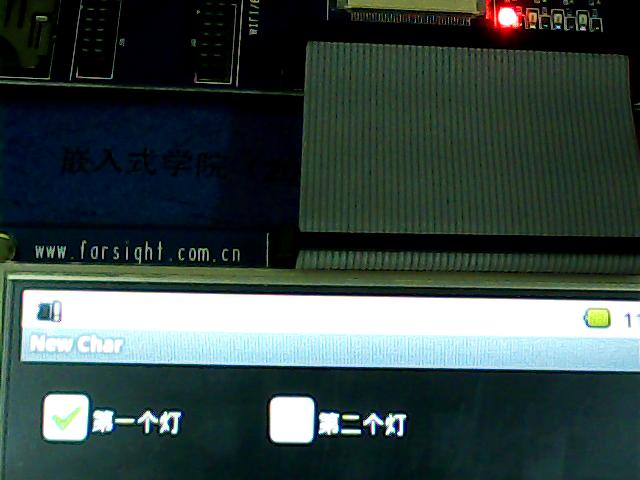
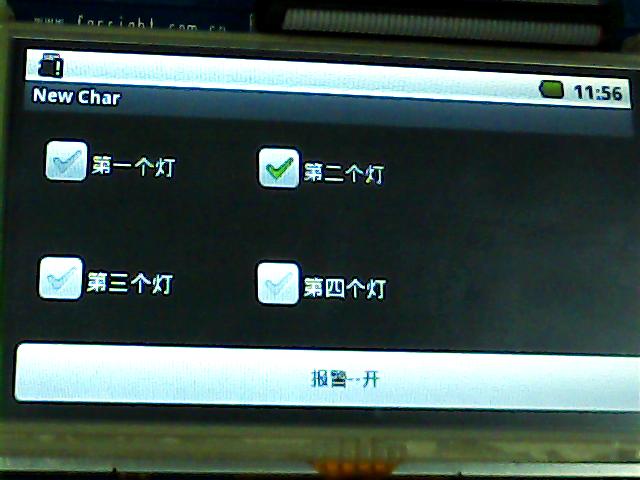
дёӢйқўжҳҜжҲ‘зҡ„дёҖдёӘйЎ№зӣ®зҡ„жҲӘеӣҫпјҡ
еӣ дёәи®ҫи®ЎеҲ°M0ејҖеҸ‘жқҝпјҢжүҖд»Ҙдјҡжңүжё©ж№ҝеәҰд»ҘеҸҠRFIDеҚЎзҡ„жҲӘеӣҫгҖӮ


жәҗз ҒдёӢиҪҪең°еқҖпјҡhttp://download.csdn.net/detail/k_linux_man/3865567
Androidж №ж–Ү件系з»ҹгҖҒеҶ…ж ёzIamgeдёӢиҪҪ;http://download.csdn.net/detail/k_linux_man/3865826
еҲҶдә«еҲ°пјҡ


зӣёе…іжҺЁиҚҗ
иҮӘе·ұеҠЁжүӢеҶҷжңҖз®ҖеҚ•зҡ„Androidй©ұеҠЁ---LEDй©ұеҠЁзҡ„зј–еҶҷ жҠҖжңҜеҚҡе®ўең°еқҖпјҡ http://blog.csdn.net/k_linux_man/article/details/7023824 Andoirdй©ұеҠЁзј–еҶҷгҖӮзј–еҶҷAndroidй©ұеҠЁе…Ҙй—Ёиө„ж–ҷ
android-support-v4-v7-v13-v14-v17(е®ҳж–№жңҖж–°е®Ңж•ҙзүҲ)пјҢе®ҳж–№жңҖж–°зүҲзҡ„пјҢеҺӢзј©еҢ…еҶ…еҢ…еҗ«android-support-v4гҖҒandroid-support-v7-appcompat,android-support-v7-cardview,android-support-v7-gridlayout,android-support-...
rtl8723ds linuxandroid й©ұеҠЁ еҶ…еҗ«иҜҰз»Ҷ移жӨҚиҜҙжҳҺпјҢж”ҜжҢҒandroid4.4 -- android10.x
NULL еҚҡж–Үй“ҫжҺҘпјҡhttps://koliy.iteye.com/blog/1424304
AndroidеҶ…ж ёledзҒҜй©ұеҠЁзЁӢеәҸпјҢз”ЁдәҺеҶ…ж ёй©ұеҠЁзЁӢеәҸејҖеҸ‘е®һйӘҢпјҢдё»иҰҒеҠҹиғҪжҳҜе®һзҺ°ledзҒҜзҡ„зӮ№дә®е’ҢзҶ„зҒӯ
Androidзј–еҶҷй©ұеҠЁзЁӢеәҸжЎҲдҫӢ
еұ•и®Ҝе№іеҸ°й©ұеҠЁSCI-android-usb-driver-jungo
i2c-toolsзЁӢеәҸпјҢеҢ…еҗ«i2ctransfterпјҢеҸҜд»ҘиҜ»еҶҷ16дҪҚеҜ„еӯҳеҷЁең°еқҖ
е°Ҷandroid-18и§ЈеҺӢеҲ°Android\android-sdk\platformsдёӢгҖӮ
дё»иҰҒд»Ӣз»ҚдәҶAndroid й©ұеҠЁзј–еҶҷLED-NDKзЁӢеәҸзҡ„зӣёе…іиө„ж–ҷ,йңҖиҰҒзҡ„жңӢеҸӢеҸҜд»ҘеҸӮиҖғдёӢ
жңҖж–°android studio 2015/10/12ж—Ҙжӣҙж–° 2015/10/12 android-studio-bundle-141.2288178-windows
е°Ҷandroid-17.zipи§ЈеҺӢеҲ° Android\android-sdk\platforms ж–Ү件еӨ№дёӢгҖӮ
иҝҷжҳҜжңҖж–°зүҲзҡ„android-support-v4.jarпјҢеӨ§е°Ҹ1MBеӨҡпјҢжҜ”е…¶е®ғйӮЈз§ҚеҮ зҷҫKзҡ„иҰҒеӨ§пјҢеӣ дёәиҝҷжҳҜжңҖж–°зҡ„android-support-v4.jarпјҢжңүжңҖж–°зҡ„android.support.v4.view.animationзұ»пјҢзҺ°еңЁжҳҜ2015е№ҙ10жңҲпјҢиҝҷжҳҜжҲӘиҮізӣ®еүҚжңҖж–°зҡ„jarеҢ…
ksoap2-android-assembly-2.6.5-jar-with-dependencies.jar иҰҒжҳҜйңҖиҰҒжңҖж–°зҡ„пјҢдёӢиҪҪең°еқҖпјҡ http://code.google.com/p/ksoap2-android/
Androidе№іеҸ°зҡ„U-bloxиҠҜзүҮGPSй©ұеҠЁ3.40жәҗз Ғ ж”ҜжҢҒеҢ—ж–— зӯүжүҖжңүеҚ«жҳҹжҳҫзӨә жәҗз ҒзҺҜеўғзј–иҜ‘пјҢ
iTOP-4412-Android4.0-usb-wifiпјҲ360дәҢд»ЈпјүеҶ…ж ёе’ҢAndroidй©ұеҠЁд»ҘеҸҠAndroidжөӢиҜ•дҫӢзЁӢ.zip
android-sdk_r05-XXXе®ҳж–№дёӢиҪҪең°еқҖпјҡ пјҲ1пјүhttp://dl.google.com/android/android-sdk_r05-windows.zip пјҲ2пјүhttp://dl.google.com/android/android-sdk_r05-mac_86.zip пјҲ3пјү...
rk3566-box-demo-android11-RTL8822CSи°ғиҜ•
AndroidиҮӘе®ҡд№үViewд№Ӣз»„еҗҲжҺ§д»¶ ---- LEDж•°еӯ—ж—¶й’ҹ
android5.1 ledй©ұеҠЁ еҲ°apkдёҖдҪ“еҢ–жҺҘеҸЈ